«
March 5, 2012 | 7:44 PM

Jam dah pukul 3.19 pagi. Tapi mata still tak mengantuk. Semua gara-2 minum nexcafe tadi. Aihh. Menyesal pulak. Tapi takpe lah. Sekali sekala kan? Hehe. Dah alang-2 tak boleh tidur, tadi bukak photoshop. Niat di hati nak buat cover fanfic lagi. Tapi entah kenapa jari jemari nie tetiba edit cursors pulak. Haaa, nie yana bagi korang. Amek ah :)
#troll face
#me gusta_i
#me gusta_ii
#me gusta_iii
#lol face
#like a boss_i
#like a boss_ii
#forever alone_i
#forever alone_ii
Click pada gambar untuk amek url dia eh? Well, memandangkan menda alah kat atas tu agak femes sekarang nie, tu yang yana rajin buat cursors dorang. Hikhok. Baik tak yana? Tak? Kfine. Merajuk ah cenggini :p kekeke. By the way, dah amek tu comment lah ye? Boleh yana blog walking ke blog korang pulak. Eheee :D
Anyway, petang tadi yana da submit skin baru. Woot ~ Tapi tak lawa pun. Simple jah. Skin tu yana tweak dari skin nie. Eheh. Nah tengok kat sini > SKIN BARU YANA < hehe :p InsyaAllah esok atau lusa atau lepas final nanti yana submit skin baru pulak. Dalam proses tengah buat nieh. Hoho. Tetiba semangat lebih. Haaa. Okay lah. Takat nie dulu yana punya entry. Nak tidur dulu. Jumpa lagi di lain hari. Assalamualaikum :)
#SantapanMindaDiMalamHari :Dari Abu Hurairah r.a, dari nabi s.a.w baginda bersabda : Apabila seseorang kamu datang ke tempat tidurnya (hendak tidur), hendaklah dikipaskannya dengan hujung kainnya tiga kali dan hendaklah dibacanya : "Dengan nama Engkau Ya Tuhan, aku rebahkan rusukku (tidur) dan dengan nama Engkau aku angkat (bangun). Jika engkau ambil jiwaku, hendaklah Engkau ampuni dan jika Engkau lepaskan (kembalikan) hendaklah Engkau pelihara sebagaimana engkau memelihara hamba-hamba Engkau yang soleh." Amin :)
Lots of Love,Yana♥Labels: blogskin, cursor, danbo, forever alone, freebies, like a boss, me gusta, troll face
January 2, 2012 | 12:06 AM
Request dari Lylla, she ask me cemana yana buat link jadi macam ada shadow tu. Okay, this is just a simple tuto. Blogskin users or any template from blogger.com users boleh guna. Just follow this step!^^ #Warning hard (amaran keras)! Just menjadi dalam Google Crome sahaja. Harap maklum :)
1. Blogger.com > Dashboard > Template > Edit HTML
2. Ctrl + F, search for this code :
a:hover {
3. Dah jumpa? Kat bawah tu ada code yang korang dah edit sebelum nie kan? Korang replace code tu dengan code nie :
color: transparent;text-shadow: 10px 0px 1px #888;-webkit-transition: .5s;-moz-transition: .5s;}
So, code korang akan jadi macam nie :
a:hover {color: transparent;text-shadow: 10px 0px 1px #888;-webkit-transition: .5s;-moz-transition: .5s;}
#yang merah tu korang boleh pilih warna yang korang suka kat SINI#yang purple tu korang boleh tukar. yang tu untuk shadow effect nanti. Kalau taknak tukar pun takpe^^
4. Then Save Template. Siap!^^
Lots of Love,Yana♥Labels: blogskin, hover, link, tutorial
December 31, 2011 | 2:01 AM
Morning! Alhamdulillah masih diberi kesempatan untuk beribadah lagi hari ini. Well, hari nie dah 31/12/2011. The last day for this year. Macam2 yang dah jadi tahun nie. Suka duka semua ada. Tapi alhamdulillah, semua tu jadikan yana untuk jadi seorang yang tabah dan kuat. InsyaAllah :)
Anyway, tuto nie request dari Scha. Sory dear, lambat buat tuto nie :/ #Amaran keras! This tuto is only for blogskin users. So, let's begin! :3
1. Blogger.com > Dashboard > Template
2. Ctrl + F, search for this code :
</style>
update : for denim template or other template from blogger.com, cari code nie : ]]></b:skin>
3. Copy code kat bawah nie, then paste SEBELUM code tadi tu :
.music {
padding:15px;border-bottom-right-radius:10px;background:white;}#ytube {text-align: center;position:fixed;left:10px;top:-55px;-webkit-transition: all .5s ease-in-out;-moz-transition: all .5s ease-in-out;-o-transition: all .5s ease-in-out;z-index:999;}#ytube:hover {top:-10px;}#pict {height:35px;background:#fff;border-bottom-left-radius: 5px;border-bottom-right-radius: 5px;width: 50px;align:center;}
#yang biru tu boleh diubah mengikut keselesaan dan kesesuaian masing-masing. Mwehehe :3
4. Then cari code </body> dan paste code bawah nie SEBELUM code </body>
<div id="ytube">
<div class="music">PASTE YOUTUBE EMBED CODE HERE</div><div id="pict"><br><img src="IMG URL"></div>
update : Paste code step nie dalam HTML/JavaScript box.
#Yang merah tu boleh letak image yang comel2. Macam yana letak kat atas tu. Boleh ke SINI untuk image yang omeyy :D or copy je url kat bawah nie kalau nak senang ^_^
http://dl4.glitter-graphics.net/pub/994/994264zaow639gzm.gif
http://dl2.glitter-graphics.net/pub/122/122842r9l2jjtjaf.gif
http://dl5.glitter-graphics.net/pub/220/220645u9r9sjvsfp.gif
http://dl6.glitter-graphics.net/pub/137/137456a7yi159cti.gif
5. Save! Dah siap :D
Kalau tak paham pape tanya la. Thanks for coming. Assalamualaikum^^
Lots of Love,
Yana♥Labels: blogskin, classic template, tutorial, youtube
December 30, 2011 | 2:50 PM
Request dari asa, dia tanya cemana yana buat scroll bar tu jadi camtu, ade black solid line kat belakang tu. Actually yana tak reti nak explain cemana. But, nak senang cite, ikut step macam kat bawah nie :
1. Blogger.com > Dashboard > Template
2. Ctrl + F search code :
::-webkit-scrollbar {
3. Kat bawah2 tu kan ade anak2 dia. Then lastly ada code }. Letak code kat bawah nie SELEPAS code } tadi tu :
::-webkit-scrollbar-track-piece {background-color: #000;border: 5px solid #fff;}
#yang biru tu boleh tukar ikut warna yang korang nak#yang merah tu korang boleh adjust ikut size scrollbar-thumb korang tu. Contoh kalau size scrollbar-thumb korang 11px, korang letak la 5px kalau nak dia jadi seimbang kiri kanan untuk border dia tu. Err, paham tak? Adeih -.-
4. Dah selesai semua, save la template korang tu.
p/s : Korang try and error la. Yana pun tak reti sangat nak explain nie. Huhu. Btw, selamat mencuba!^^ Tak paham pape tanya je la. InsyaAllah yana tolong :)
Lots of Love,Yana♥Labels: blogskin, classic template, scrollbar, tutorial
November 12, 2011 | 1:45 AM
Direquest dari IntanSuraya. SO, tanpa membuang masa meh kita mula^^
1. Dashboard > Template #for blogskin users
2. tekan F3, search for this code :
<head>
3. Copy and paste code nie AFTER/SELEPAS code <head> tadi :
<div style=" position:absolute; top:20px; right:10px; width:200px;"><center style="text-align: right; color: #FFA8C1;">Update Box</center><div style="Background-image:url(IMG URL); repeat; padding: 10px; border:2px solid #FFA8C1; filter:alpha(opacity=1.5); border-radius:10px;"><center><marquee>YOUR TEXT</marquee></center></div><div style=" position:absolute; top:50px; left:20px;"></div></div>
#yang merah tu korang boleh ubah kedudukan dia. Adjust lah bagi lawa :)#yang purple tu boleh ubah color untuk ayat korang tu#yang biru, korang boleh tukar dengan ayat korang#yang hijau untuk background box tu
4. Save Template
**Kalau untuk blogger.com users, code kat atas tu just copy and paste dalam HTML/JavaScript box :)
Lots of Love,Yana♥Labels: blogskin, box, classic template, tutorial, update
November 2, 2011 | 10:33 AM
This tuto request from shi_a. Korang try letak cursor kat header yana. Hilangkan? Heee. Magic tak? Magic tak? XD So, meh sini yana nak ajar macam mana nak buat ^_^
1. Dashboard > Template > Edit HTML
2. Ctrl + F, search for this code :
#header {
Kat bawah dia ada anak2 dia kan? Tapi lastly dia ada penutup dia simbol } kan?
3. Jumpa? Copy this code and paste BAWAH atau BELOW \bahasa omputihnya/ code } tadi.
#header:hover {padding-left:160px;-webkit-transition: .4s;opacity:.01;}
#yang merah tu korang boleh ubah ikut suka korang macam mana. Save! Hikhok. Tu je. Kboiii :D
##untuk pengguna blogskin :
1. Kalau korang punya header menggunakan code nie :
<center><img src="URL HEADER" /></center>
Korang tukar code tu dengan code nie :
<center><img class="header" src="URL HEADER" /></center>
2. Then, korang Ctrl + F, search for this code :
<style type="text/css">
3. Pastekan code nie, kat BAWAH code <style type="text/css"> tu :
.header {text-align: center;-webkit-transition: 1s;opacity:100;}.header:hover {padding-left:160px;-webkit-transition: .4s;opacity:.01;}
#yang purple tu letak image header korang.#yang merah boleh uabh ikut suka korang. Then save template. Siap!^^
Lots of LoveYana♥Labels: blogskin, classic template, domo, header, hover, tutorial
| 3:48 AM
ototototo tomeyyyy >,<
Tuto nie request dari Zyra. Hoo. Tengah takde bende nak buat nie meh yana buat tuto. Tuto nie senang je. Okayy. Lets begin!
1. Dashboard > Template
2. Ctrl + F, search for this code :
</head>
3. Copy code kat bawah nie, and paste BEFORE code </head>
<script type="text/javascript" src="http://ajax.googleapis.com/ajax/libs/jquery/1.3.2/jquery.min.js"></script><script type='text/javascript' language='Javascript'>var scrolltotop={//startline: Integer. Number of pixels from top of doc scrollbar is scrolled before showing control//scrollto: Keyword (Integer, or "Scroll_to_Element_ID"). How far to scroll document up when control is clicked on (1=top).setting: {startline:100, scrollto: 0, scrollduration:1000, fadeduration:[500, 500]},controlHTML: '<img onmousedown="event.preventDefault ? event.preventDefault() : event.returnValue = false" src="URL IMG"/>', //HTML for control, which is auto wrapped in DIV w/ ID="topcontrol"controlattrs: {offsetx:5, offsety:5}, //offset of control relative to right/ center of window corneranchorkeyword: '#top', //Enter href value of HTML anchors on the page that should also act as "Scroll Up" linksstate: {isvisible:false, shouldvisible:false},scrollup:function(){if (!this.cssfixedsupport) //if control is positioned using JavaScriptthis.$control.css({opacity:0}) //hide control immediately after clicking itvar dest=isNaN(this.setting.scrollto)? this.setting.scrollto : parseInt(this.setting.scrollto)if (typeof dest=="string" && jQuery('#'+dest).length==1) //check element set by string existsdest=jQuery('#'+dest).offset().topelsedest=0this.$body.animate({scrollTop: dest}, this.setting.scrollduration);},keepfixed:function(){var $window=jQuery(window)var controlx=$window.scrollLeft() + $window.width() - this.$control.width() - this.controlattrs.offsetxvar controly=$window.scrollTop() + $window.height() - this.$control.height() - this.controlattrs.offsetythis.$control.css({left:controlx+'px', top:controly+'px'})},togglecontrol:function(){var scrolltop=jQuery(window).scrollTop()if (!this.cssfixedsupport)this.keepfixed()this.state.shouldvisible=(scrolltop>=this.setting.startline)? true : falseif (this.state.shouldvisible && !this.state.isvisible){this.$control.stop().animate({opacity:1}, this.setting.fadeduration[0])this.state.isvisible=true}else if (this.state.shouldvisible==false && this.state.isvisible){this.$control.stop().animate({opacity:0}, this.setting.fadeduration[1])this.state.isvisible=false}},init:function(){jQuery(document).ready(function($){var mainobj=scrolltotopvar iebrws=document.allmainobj.cssfixedsupport=!iebrws || iebrws && document.compatMode=="CSS1Compat" && window.XMLHttpRequest //not IE or IE7+ browsers in standards modemainobj.$body=(window.opera)? (document.compatMode=="CSS1Compat"? $('html') : $('body')) : $('html,body')mainobj.$control=$('<div id="topcontrol">'+mainobj.controlHTML+'</div>').css({position:mainobj.cssfixedsupport? 'fixed' : 'absolute', bottom:mainobj.controlattrs.offsety, right:mainobj.controlattrs.offsetx, opacity:0, cursor:'pointer'}).attr({title:'Take Me Higher'}).click(function(){mainobj.scrollup(); return false}).appendTo('body')if (document.all && !window.XMLHttpRequest && mainobj.$control.text()!='') //loose check for IE6 and below, plus whether control contains any textmainobj.$control.css({width:mainobj.$control.width()}) //IE6- seems to require an explicit width on a DIV containing textmainobj.togglecontrol()$('a[href="' + mainobj.anchorkeyword +'"]').click(function(){mainobj.scrollup()return false})$(window).bind('scroll resize', function(e){mainobj.togglecontrol()})})}}scrolltotop.init()</script>
#yang merah tu korang boleh letak image yg korang nak utk button back to top.
#yang purple tu korang boleh tukar ayat korang sendiri.
4. Save. Siap!^^
update :
Kalau nak buat Top Button macam yana, yang ada kat entry saje nie korang boleh ikut step nie :
1. Dashboard > Template
2. Ctrl + F, search for this code :
</OlderPosts> ATAU <NewerPosts>
3. Dah jumpa? Copy code nie and paste antara dua code tu \kalau nak letak kat tengah2 older and newer post tu/
<a href="javascript:scroll(0,0)">Top</a>
#yang merah tu boleh tukar kalau nak.
Thats all. Kboiii :D
Labels: back to top, blogskin, button, rilakkuma, tutorial
October 30, 2011 | 12:31 PM
Hari nie yana nak buat tuto. Haha! Mood agak okay. Nak cakap happy, tak. Nak cakap sedih pun tak. Biasa jahh :D
Ulat ye? Heee. Semut lah sayang. Hoho. Takpe2. Meh sini yana ajar ye :D
1. Dashboard > Template > Edit HTML \for blogger template/1. Dashboard > Template \for blogskin template/
2. Ctrl + F, search for this code :
<head>
3. Copy code nie and paste DI BAWAH code <head> tadi :
<div id="img" style="position: fixed; right: 5px; top: 20px;"><img src="http://i374.photobucket.com/albums/oo182/nlby/ant.gif" /></div>
#yang merah tu korang boleh ubah kalau nak tukar kedudukan dia :)
4. Save. Siap! Mudah saja kann? :D
p/s : actually tuto nie boleh je guna untuk buat image yang terapung tu. tak semestinya untuk semut comel nie je. dan kpd sesapa yang terkena tu sorry lah yee? :D
Update :
Kalau tak jadi, korang paste je code tadi tu ke dalam HTML/JavaScript box. Untuk pengguna template dari blogger.com only ye? :)
Lots of Love,Yana♥Labels: anigif, blogskin, tutorial
October 29, 2011 | 6:52 AM
#my honey bunch, wonnie oppa X)♥
Ade orang tanya yana camane nak letak icon kat tepi post title tu. Meh sini nak ajar. Tuto nie simple je. :)
1. Dashboard > Template
2. Ctrl + F, search for this code :
<$BlogItemTitle$>
3. Dah jumpa? Copy code kat bawah nie, dan paste SEBELUM code tadi :
<img src ="URL IMG"/>
So, nanti akan jadi macam nie :
<img src ="URL IMG"/><$BlogItemTitle$>
4. Save. Siap! :D
p/s : kalau code <$BlogItemTitle$> korang tu ada dua, paste je code <img src ="URL IMG"/> kat sebelum dua2 code tu :) Labels: blogskin, tutorial
October 18, 2011 | 4:35 PM
Tadi bukak shoutbox. Tengok ada request dari Hidayah untuk tuto nie. Korang tengok kat atas tu, yana punya button Dashboard an +Follow kat sebelah kanan kan? Haaa. Meh sini yana nak ajar :)
1. Dashboard > Template
2. Ctrl+F cari code nie
<head>
3. Dah jumpa tu, copy dan paste code di bawah selepas code <head> tadi
<div style="position: fixed; top:0px; right: 0px; width:345px; border-radius:5px; padding:3px; background:url(URL IMAGE); color:#ffffff; font-size:11px;">
<center> Kamu dah tersekat di blog saya. Pilih<a href="http://www.blogger.com/home"target="_blank">Dashboard</a> atau <a href="http://www.blogger.com/follow-blog.g?blogID=ID BLOG KORANG"target="_blank">Follow</a></center></div>
#yang warna oren tu boleh ditukar macam yang korang nak. top dan right untuk kedudukan link korang tu nanti. yang color tu untuk warna tulisan.#warna merah boleh letak ape yang korang nak untuk image. Blog ID tu pulak letak lah ID korang tu.#warna purple tu korang tukarlah dengan ayat korang tu.
4. Save template. Siap!^^
update
Untuk pengguna template dari blogger.com, paste-kan code kat atas tu ke dalam HTML/Javascript box ye? :)
update2
Kalau nak buat macama yana, yang background dia penuh kat atas tu, kat code width:345px tu boleh tukar jadi width:100% . Then save :)
Lots of Love,Yana ♥Labels: blogskin, dashboard, domo, follow, tutorial
October 16, 2011 | 5:31 AM
Ada yang tanya, macam mana nak buat post title kat blogskin template boleh di click? Korang tengok post title yana, boleh click kan? Nak buat tu senang je. Just ikut step kat bawah nie dah okay :)
1. Dashboard > Template
2. Ctrl + F, search for this code :
<$BlogItemTitle$>
3. Jumpa? Delete that code and REPLACE with this code :
<span class="PostTitle"><a href="<$BlogItemPermalinkURL$>"><$BlogItemTitle$></a></span>
4. Save Template. Siap!^^
Lots of LoveYana♥Labels: blogskin, classic template, enable, link, post title, tutorial
October 14, 2011 | 4:52 AM
Ada sesetengah template blogskin, dia punya comment link tak berfungsi. So, bagi mengatasi masalah ini, kita haruslah mengikut langkah-langkah atau inisiatif-inisiatif seperti di bawah \ayat karangan BM SPM. luls XD/
1. Dashboard > Template
2. Ctrl + F, search for this code :
<$BlogItemBody$>
3. Copy and paste this code AFTER code <$BlogItemBody$>
<center><a href="<$BlogItemCommentCreate$>"<$BlogItemCommentFormOnClick$>> <span style="font-size: 7.5pt; background-color:#ffffff; padding: 4px; text-transform: uppercase;"><$BlogItemCommentCount$> Comment(s) </span></a></BlogItemCommentsEnabled>
#yang merah tu boleh tukar kalau nak.##kalau korang dah ada code nie, sila skip step ni. Just proceed to the next step.
4. Then, korang pegi ke Setting > Comments > Comment Form Placement > Tick Pop-up window
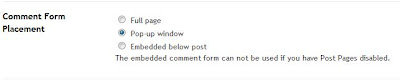
Save dan lihat hasilnya :D
Update
Kalau korang malas nak buat kerja banyak2 kali, korang boleh guna cara kat bawah nie untuk buat comment box tu berfungsi. Credit to Qay :)
1. Dashboard > Template
2. Ctrl + F, search for this code :
</blogger>
3. Jumpa? Copy this code and paste BEFORE </blogger>
<BlogItemCommentsEnabled><a class="comments" href="https://www.blogger.com/comment.g?blogID=YOUR BLOG ID&postID=<$BlogItemNumber$>&isPopup=true" onclick="window.open('https://www.blogger.com/comment.g?blogID=YOUR BLOG ID&postID=<$BlogItemNumber$>&isPopup=true', 'bloggerPopup', 'toolbar=0,scrollbars=1,location=0,statusbar=1,menubar=0,resizable=1,width=250,height=360');return false;"><$BlogItemCommentCount$> comment(s)</a></BlogItemCommentsEnabled>
#yang merah tu tukar dengan blog ID korang. Tak tau nak amek kat mane? Tengok kat SINI.#yang biru boleh tukar dengan ayat korang.
Lots of LoveYana♥Labels: add, blogskin, classic template, comment, enable, how to, inline, tutorial
October 10, 2011 | 2:26 AM
Ramai yang tanya pasal masalah nie. Macam mana nak guna blogskin nie? Kenapa saya paste code dia, lepas tu nak save ada error? Dan sebagainya lah soalan2 pasal nak pakai blogskin nie. Meh sini cikgu nak ajar meh.
First of all, korang kena ubah template yang korang guna tu. Korang kena revert template korang kepada old template || classic template.
1. Dashboard > Template > scroll ke bawah sekali > Revert To Classic Template
2. Dah revert? Korang kosongkan HTML box korang tu.
3. Then, korang amek code blogskin yang korang nak guna tu, then paste ke dalam HTML box yang korang dah kosongkan tadi. Nak amek code macam mana? Korang kena download template dia dulu. Pegi ke SINI untuk men-download.
4. Dah download tu, korang bukak code tu dalam notepad, then copy semua code dia. Lepas tu paste je dalam HTML box yang kosong tu. Save dan SIAP!^^
Lots of Love,Yana♥Labels: blog, blogskin, classic template, domo, tutorial
|
 Disclaimer

This blog belongs to me and me only. All items made by me unless stated in credit section below. No ripping, spamming and copying w/o my permission. Respect me and I'll respect you. Thank you :)
Credits
This template 100% made by me. Yana Cheya. With little help from my old skins. For icons, I used Canva. Color got from HTML color code. Font from Dafont and Google Web Font. Kindly inform me if I'm using your materials but i don't mention here.
(c) Copyright by Yana Cheya. All right reserved 2012 (c)
|

The Webmiss

♥ Yan | Yana | Angah.
♥ Turns older every Jan 10.
♥ Nomad.
♥ Suka makan.
♥ My family is my priority.
♥ Happily married with a great man ♥.
♥ Having a kawaii and clever daughter ♥.
♥ Once a programmer. Now a mom and a domestic engineer. Enjoying my day as a domestic engineer.
? Le' Stuffies
Take all cupcakes you need :)

How to copy codes, highlight the codes and Ctrl + C. I have disable right click. Don't ask me again why you can't copy my codes. Do not copy my tutors without credits. No Plagiarism please! Or I'll shoot you just like Haibara Ai did! >:) Thanks for your visit :')
«
March 5, 2012 | 7:44 PM
Jam dah pukul 3.19 pagi. Tapi mata still tak mengantuk. Semua gara-2 minum nexcafe tadi. Aihh. Menyesal pulak. Tapi takpe lah. Sekali sekala kan? Hehe. Dah alang-2 tak boleh tidur, tadi bukak photoshop. Niat di hati nak buat cover fanfic lagi. Tapi entah kenapa jari jemari nie tetiba edit cursors pulak. Haaa, nie yana bagi korang. Amek ah :)
#troll face
#me gusta_i
#me gusta_ii
#me gusta_iii
#lol face
#like a boss_i
#like a boss_ii
#forever alone_i
#forever alone_ii
Click pada gambar untuk amek url dia eh? Well, memandangkan menda alah kat atas tu agak femes sekarang nie, tu yang yana rajin buat cursors dorang. Hikhok. Baik tak yana? Tak? Kfine. Merajuk ah cenggini :p kekeke. By the way, dah amek tu comment lah ye? Boleh yana blog walking ke blog korang pulak. Eheee :D
Anyway, petang tadi yana da submit skin baru. Woot ~ Tapi tak lawa pun. Simple jah. Skin tu yana tweak dari skin nie. Eheh. Nah tengok kat sini > SKIN BARU YANA < hehe :p InsyaAllah esok atau lusa atau lepas final nanti yana submit skin baru pulak. Dalam proses tengah buat nieh. Hoho. Tetiba semangat lebih. Haaa. Okay lah. Takat nie dulu yana punya entry. Nak tidur dulu. Jumpa lagi di lain hari. Assalamualaikum :)
#SantapanMindaDiMalamHari :Dari Abu Hurairah r.a, dari nabi s.a.w baginda bersabda : Apabila seseorang kamu datang ke tempat tidurnya (hendak tidur), hendaklah dikipaskannya dengan hujung kainnya tiga kali dan hendaklah dibacanya : "Dengan nama Engkau Ya Tuhan, aku rebahkan rusukku (tidur) dan dengan nama Engkau aku angkat (bangun). Jika engkau ambil jiwaku, hendaklah Engkau ampuni dan jika Engkau lepaskan (kembalikan) hendaklah Engkau pelihara sebagaimana engkau memelihara hamba-hamba Engkau yang soleh." Amin :)
Lots of Love,Yana♥Labels: blogskin, cursor, danbo, forever alone, freebies, like a boss, me gusta, troll face
January 2, 2012 | 12:06 AM
Request dari Lylla, she ask me cemana yana buat link jadi macam ada shadow tu. Okay, this is just a simple tuto. Blogskin users or any template from blogger.com users boleh guna. Just follow this step!^^ #Warning hard (amaran keras)! Just menjadi dalam Google Crome sahaja. Harap maklum :)
1. Blogger.com > Dashboard > Template > Edit HTML
2. Ctrl + F, search for this code :
a:hover {
3. Dah jumpa? Kat bawah tu ada code yang korang dah edit sebelum nie kan? Korang replace code tu dengan code nie :
color: transparent;text-shadow: 10px 0px 1px #888;-webkit-transition: .5s;-moz-transition: .5s;}
So, code korang akan jadi macam nie :
a:hover {color: transparent;text-shadow: 10px 0px 1px #888;-webkit-transition: .5s;-moz-transition: .5s;}
#yang merah tu korang boleh pilih warna yang korang suka kat SINI#yang purple tu korang boleh tukar. yang tu untuk shadow effect nanti. Kalau taknak tukar pun takpe^^
4. Then Save Template. Siap!^^
Lots of Love,Yana♥Labels: blogskin, hover, link, tutorial
December 31, 2011 | 2:01 AM
Morning! Alhamdulillah masih diberi kesempatan untuk beribadah lagi hari ini. Well, hari nie dah 31/12/2011. The last day for this year. Macam2 yang dah jadi tahun nie. Suka duka semua ada. Tapi alhamdulillah, semua tu jadikan yana untuk jadi seorang yang tabah dan kuat. InsyaAllah :)
Anyway, tuto nie request dari Scha. Sory dear, lambat buat tuto nie :/ #Amaran keras! This tuto is only for blogskin users. So, let's begin! :3
1. Blogger.com > Dashboard > Template
2. Ctrl + F, search for this code :
</style>
update : for denim template or other template from blogger.com, cari code nie : ]]></b:skin>
3. Copy code kat bawah nie, then paste SEBELUM code tadi tu :
.music {
padding:15px;border-bottom-right-radius:10px;background:white;}#ytube {text-align: center;position:fixed;left:10px;top:-55px;-webkit-transition: all .5s ease-in-out;-moz-transition: all .5s ease-in-out;-o-transition: all .5s ease-in-out;z-index:999;}#ytube:hover {top:-10px;}#pict {height:35px;background:#fff;border-bottom-left-radius: 5px;border-bottom-right-radius: 5px;width: 50px;align:center;}
#yang biru tu boleh diubah mengikut keselesaan dan kesesuaian masing-masing. Mwehehe :3
4. Then cari code </body> dan paste code bawah nie SEBELUM code </body>
<div id="ytube">
<div class="music">PASTE YOUTUBE EMBED CODE HERE</div><div id="pict"><br><img src="IMG URL"></div>
update : Paste code step nie dalam HTML/JavaScript box.
#Yang merah tu boleh letak image yang comel2. Macam yana letak kat atas tu. Boleh ke SINI untuk image yang omeyy :D or copy je url kat bawah nie kalau nak senang ^_^
http://dl4.glitter-graphics.net/pub/994/994264zaow639gzm.gif
http://dl2.glitter-graphics.net/pub/122/122842r9l2jjtjaf.gif
http://dl5.glitter-graphics.net/pub/220/220645u9r9sjvsfp.gif
http://dl6.glitter-graphics.net/pub/137/137456a7yi159cti.gif
5. Save! Dah siap :D
Kalau tak paham pape tanya la. Thanks for coming. Assalamualaikum^^
Lots of Love,
Yana♥Labels: blogskin, classic template, tutorial, youtube
December 30, 2011 | 2:50 PM
Request dari asa, dia tanya cemana yana buat scroll bar tu jadi camtu, ade black solid line kat belakang tu. Actually yana tak reti nak explain cemana. But, nak senang cite, ikut step macam kat bawah nie :
1. Blogger.com > Dashboard > Template
2. Ctrl + F search code :
::-webkit-scrollbar {
3. Kat bawah2 tu kan ade anak2 dia. Then lastly ada code }. Letak code kat bawah nie SELEPAS code } tadi tu :
::-webkit-scrollbar-track-piece {background-color: #000;border: 5px solid #fff;}
#yang biru tu boleh tukar ikut warna yang korang nak#yang merah tu korang boleh adjust ikut size scrollbar-thumb korang tu. Contoh kalau size scrollbar-thumb korang 11px, korang letak la 5px kalau nak dia jadi seimbang kiri kanan untuk border dia tu. Err, paham tak? Adeih -.-
4. Dah selesai semua, save la template korang tu.
p/s : Korang try and error la. Yana pun tak reti sangat nak explain nie. Huhu. Btw, selamat mencuba!^^ Tak paham pape tanya je la. InsyaAllah yana tolong :)
Lots of Love,Yana♥Labels: blogskin, classic template, scrollbar, tutorial
November 12, 2011 | 1:45 AM
Direquest dari IntanSuraya. SO, tanpa membuang masa meh kita mula^^
1. Dashboard > Template #for blogskin users
2. tekan F3, search for this code :
<head>
3. Copy and paste code nie AFTER/SELEPAS code <head> tadi :
<div style=" position:absolute; top:20px; right:10px; width:200px;"><center style="text-align: right; color: #FFA8C1;">Update Box</center><div style="Background-image:url(IMG URL); repeat; padding: 10px; border:2px solid #FFA8C1; filter:alpha(opacity=1.5); border-radius:10px;"><center><marquee>YOUR TEXT</marquee></center></div><div style=" position:absolute; top:50px; left:20px;"></div></div>
#yang merah tu korang boleh ubah kedudukan dia. Adjust lah bagi lawa :)#yang purple tu boleh ubah color untuk ayat korang tu#yang biru, korang boleh tukar dengan ayat korang#yang hijau untuk background box tu
4. Save Template
**Kalau untuk blogger.com users, code kat atas tu just copy and paste dalam HTML/JavaScript box :)
Lots of Love,Yana♥Labels: blogskin, box, classic template, tutorial, update
November 2, 2011 | 10:33 AM
This tuto request from shi_a. Korang try letak cursor kat header yana. Hilangkan? Heee. Magic tak? Magic tak? XD So, meh sini yana nak ajar macam mana nak buat ^_^
1. Dashboard > Template > Edit HTML
2. Ctrl + F, search for this code :
#header {
Kat bawah dia ada anak2 dia kan? Tapi lastly dia ada penutup dia simbol } kan?
3. Jumpa? Copy this code and paste BAWAH atau BELOW \bahasa omputihnya/ code } tadi.
#header:hover {padding-left:160px;-webkit-transition: .4s;opacity:.01;}
#yang merah tu korang boleh ubah ikut suka korang macam mana. Save! Hikhok. Tu je. Kboiii :D
##untuk pengguna blogskin :
1. Kalau korang punya header menggunakan code nie :
<center><img src="URL HEADER" /></center>
Korang tukar code tu dengan code nie :
<center><img class="header" src="URL HEADER" /></center>
2. Then, korang Ctrl + F, search for this code :
<style type="text/css">
3. Pastekan code nie, kat BAWAH code <style type="text/css"> tu :
.header {text-align: center;-webkit-transition: 1s;opacity:100;}.header:hover {padding-left:160px;-webkit-transition: .4s;opacity:.01;}
#yang purple tu letak image header korang.#yang merah boleh uabh ikut suka korang. Then save template. Siap!^^
Lots of LoveYana♥Labels: blogskin, classic template, domo, header, hover, tutorial
| 3:48 AM
ototototo tomeyyyy >,<
Tuto nie request dari Zyra. Hoo. Tengah takde bende nak buat nie meh yana buat tuto. Tuto nie senang je. Okayy. Lets begin!
1. Dashboard > Template
2. Ctrl + F, search for this code :
</head>
3. Copy code kat bawah nie, and paste BEFORE code </head>
<script type="text/javascript" src="http://ajax.googleapis.com/ajax/libs/jquery/1.3.2/jquery.min.js"></script><script type='text/javascript' language='Javascript'>var scrolltotop={//startline: Integer. Number of pixels from top of doc scrollbar is scrolled before showing control//scrollto: Keyword (Integer, or "Scroll_to_Element_ID"). How far to scroll document up when control is clicked on (1=top).setting: {startline:100, scrollto: 0, scrollduration:1000, fadeduration:[500, 500]},controlHTML: '<img onmousedown="event.preventDefault ? event.preventDefault() : event.returnValue = false" src="URL IMG"/>', //HTML for control, which is auto wrapped in DIV w/ ID="topcontrol"controlattrs: {offsetx:5, offsety:5}, //offset of control relative to right/ center of window corneranchorkeyword: '#top', //Enter href value of HTML anchors on the page that should also act as "Scroll Up" linksstate: {isvisible:false, shouldvisible:false},scrollup:function(){if (!this.cssfixedsupport) //if control is positioned using JavaScriptthis.$control.css({opacity:0}) //hide control immediately after clicking itvar dest=isNaN(this.setting.scrollto)? this.setting.scrollto : parseInt(this.setting.scrollto)if (typeof dest=="string" && jQuery('#'+dest).length==1) //check element set by string existsdest=jQuery('#'+dest).offset().topelsedest=0this.$body.animate({scrollTop: dest}, this.setting.scrollduration);},keepfixed:function(){var $window=jQuery(window)var controlx=$window.scrollLeft() + $window.width() - this.$control.width() - this.controlattrs.offsetxvar controly=$window.scrollTop() + $window.height() - this.$control.height() - this.controlattrs.offsetythis.$control.css({left:controlx+'px', top:controly+'px'})},togglecontrol:function(){var scrolltop=jQuery(window).scrollTop()if (!this.cssfixedsupport)this.keepfixed()this.state.shouldvisible=(scrolltop>=this.setting.startline)? true : falseif (this.state.shouldvisible && !this.state.isvisible){this.$control.stop().animate({opacity:1}, this.setting.fadeduration[0])this.state.isvisible=true}else if (this.state.shouldvisible==false && this.state.isvisible){this.$control.stop().animate({opacity:0}, this.setting.fadeduration[1])this.state.isvisible=false}},init:function(){jQuery(document).ready(function($){var mainobj=scrolltotopvar iebrws=document.allmainobj.cssfixedsupport=!iebrws || iebrws && document.compatMode=="CSS1Compat" && window.XMLHttpRequest //not IE or IE7+ browsers in standards modemainobj.$body=(window.opera)? (document.compatMode=="CSS1Compat"? $('html') : $('body')) : $('html,body')mainobj.$control=$('<div id="topcontrol">'+mainobj.controlHTML+'</div>').css({position:mainobj.cssfixedsupport? 'fixed' : 'absolute', bottom:mainobj.controlattrs.offsety, right:mainobj.controlattrs.offsetx, opacity:0, cursor:'pointer'}).attr({title:'Take Me Higher'}).click(function(){mainobj.scrollup(); return false}).appendTo('body')if (document.all && !window.XMLHttpRequest && mainobj.$control.text()!='') //loose check for IE6 and below, plus whether control contains any textmainobj.$control.css({width:mainobj.$control.width()}) //IE6- seems to require an explicit width on a DIV containing textmainobj.togglecontrol()$('a[href="' + mainobj.anchorkeyword +'"]').click(function(){mainobj.scrollup()return false})$(window).bind('scroll resize', function(e){mainobj.togglecontrol()})})}}scrolltotop.init()</script>
#yang merah tu korang boleh letak image yg korang nak utk button back to top.
#yang purple tu korang boleh tukar ayat korang sendiri.
4. Save. Siap!^^
update :
Kalau nak buat Top Button macam yana, yang ada kat entry saje nie korang boleh ikut step nie :
1. Dashboard > Template
2. Ctrl + F, search for this code :
</OlderPosts> ATAU <NewerPosts>
3. Dah jumpa? Copy code nie and paste
antara dua code tu
\kalau nak letak kat tengah2 older and newer post tu/
<a href="javascript:scroll(0,0)">Top</a>
#yang
merah tu boleh tukar kalau nak.
Thats all. Kboiii :D
Labels: back to top, blogskin, button, rilakkuma, tutorial
October 30, 2011 | 12:31 PM
Hari nie yana nak buat tuto. Haha! Mood agak okay. Nak cakap happy, tak. Nak cakap sedih pun tak. Biasa jahh :D
Ulat ye? Heee. Semut lah sayang. Hoho. Takpe2. Meh sini yana ajar ye :D
1. Dashboard > Template > Edit HTML \for blogger template/1. Dashboard > Template \for blogskin template/
2. Ctrl + F, search for this code :
<head>
3. Copy code nie and paste DI BAWAH code <head> tadi :
<div id="img" style="position: fixed; right: 5px; top: 20px;"><img src="http://i374.photobucket.com/albums/oo182/nlby/ant.gif" /></div>
#yang merah tu korang boleh ubah kalau nak tukar kedudukan dia :)
4. Save. Siap! Mudah saja kann? :D
p/s : actually tuto nie boleh je guna untuk buat image yang terapung tu. tak semestinya untuk semut comel nie je. dan kpd sesapa yang terkena tu sorry lah yee? :D
Update :
Kalau tak jadi, korang paste je code tadi tu ke dalam HTML/JavaScript box. Untuk pengguna template dari blogger.com only ye? :)
Lots of Love,Yana♥Labels: anigif, blogskin, tutorial
October 29, 2011 | 6:52 AM
#my honey bunch, wonnie oppa X)♥
Ade orang tanya yana camane nak letak icon kat tepi post title tu. Meh sini nak ajar. Tuto nie simple je. :)
1. Dashboard > Template
2. Ctrl + F, search for this code :
<$BlogItemTitle$>
3. Dah jumpa? Copy code kat bawah nie, dan paste SEBELUM code tadi :
<img src ="URL IMG"/>
So, nanti akan jadi macam nie :
<img src ="URL IMG"/><$BlogItemTitle$>
4. Save. Siap! :D
p/s : kalau code <$BlogItemTitle$> korang tu ada dua, paste je code <img src ="URL IMG"/> kat sebelum dua2 code tu :)
Labels: blogskin, tutorial
October 18, 2011 | 4:35 PM
Tadi bukak shoutbox. Tengok ada request dari Hidayah untuk tuto nie. Korang tengok kat atas tu, yana punya button Dashboard an +Follow kat sebelah kanan kan? Haaa. Meh sini yana nak ajar :)
1. Dashboard > Template
2. Ctrl+F cari code nie
<head>
3. Dah jumpa tu, copy dan paste code di bawah selepas code <head> tadi
<div style="position: fixed; top:0px; right: 0px; width:345px; border-radius:5px; padding:3px; background:url(URL IMAGE); color:#ffffff; font-size:11px;">
<center> Kamu dah tersekat di blog saya. Pilih<a href="http://www.blogger.com/home"target="_blank">Dashboard</a> atau <a href="http://www.blogger.com/follow-blog.g?blogID=ID BLOG KORANG"target="_blank">Follow</a></center></div>
#yang warna oren tu boleh ditukar macam yang korang nak. top dan right untuk kedudukan link korang tu nanti. yang color tu untuk warna tulisan.#warna merah boleh letak ape yang korang nak untuk image. Blog ID tu pulak letak lah ID korang tu.#warna purple tu korang tukarlah dengan ayat korang tu.
4. Save template. Siap!^^
update
Untuk pengguna template dari blogger.com, paste-kan code kat atas tu ke dalam HTML/Javascript box ye? :)
update2
Kalau nak buat macama yana, yang background dia penuh kat atas tu, kat code width:345px tu boleh tukar jadi width:100% . Then save :)
Lots of Love,Yana ♥Labels: blogskin, dashboard, domo, follow, tutorial
October 16, 2011 | 5:31 AM
Ada yang tanya, macam mana nak buat post title kat blogskin template boleh di click? Korang tengok post title yana, boleh click kan? Nak buat tu senang je. Just ikut step kat bawah nie dah okay :)
1. Dashboard > Template
2. Ctrl + F, search for this code :
<$BlogItemTitle$>
3. Jumpa? Delete that code and REPLACE with this code :
<span class="PostTitle"><a href="<$BlogItemPermalinkURL$>"><$BlogItemTitle$></a></span>
4. Save Template. Siap!^^
Lots of LoveYana♥Labels: blogskin, classic template, enable, link, post title, tutorial
October 14, 2011 | 4:52 AM
Ada sesetengah template blogskin, dia punya comment link tak berfungsi. So, bagi mengatasi masalah ini, kita haruslah mengikut langkah-langkah atau inisiatif-inisiatif seperti di bawah \ayat karangan BM SPM. luls XD/
1. Dashboard > Template
2. Ctrl + F, search for this code :
<$BlogItemBody$>
3. Copy and paste this code AFTER code <$BlogItemBody$>
<center><a href="<$BlogItemCommentCreate$>"<$BlogItemCommentFormOnClick$>> <span style="font-size: 7.5pt; background-color:#ffffff; padding: 4px; text-transform: uppercase;"><$BlogItemCommentCount$> Comment(s) </span></a></BlogItemCommentsEnabled>
#yang merah tu boleh tukar kalau nak.##kalau korang dah ada code nie, sila skip step ni. Just proceed to the next step.
4. Then, korang pegi ke Setting > Comments > Comment Form Placement > Tick Pop-up window
Save dan lihat hasilnya :D
Update
Kalau korang malas nak buat kerja banyak2 kali, korang boleh guna cara kat bawah nie untuk buat comment box tu berfungsi. Credit to Qay :)
1. Dashboard > Template
2. Ctrl + F, search for this code :
</blogger>
3. Jumpa? Copy this code and paste BEFORE </blogger>
<BlogItemCommentsEnabled><a class="comments" href="https://www.blogger.com/comment.g?blogID=YOUR BLOG ID&postID=<$BlogItemNumber$>&isPopup=true" onclick="window.open('https://www.blogger.com/comment.g?blogID=YOUR BLOG ID&postID=<$BlogItemNumber$>&isPopup=true', 'bloggerPopup', 'toolbar=0,scrollbars=1,location=0,statusbar=1,menubar=0,resizable=1,width=250,height=360');return false;"><$BlogItemCommentCount$> comment(s)</a></BlogItemCommentsEnabled>
#yang merah tu tukar dengan blog ID korang. Tak tau nak amek kat mane? Tengok kat SINI.#yang biru boleh tukar dengan ayat korang.
Lots of LoveYana♥Labels: add, blogskin, classic template, comment, enable, how to, inline, tutorial
October 10, 2011 | 2:26 AM
Ramai yang tanya pasal masalah nie. Macam mana nak guna blogskin nie? Kenapa saya paste code dia, lepas tu nak save ada error? Dan sebagainya lah soalan2 pasal nak pakai blogskin nie. Meh sini cikgu nak ajar meh.
First of all, korang kena ubah template yang korang guna tu. Korang kena revert template korang kepada old template || classic template.
1. Dashboard > Template > scroll ke bawah sekali > Revert To Classic Template
2. Dah revert? Korang kosongkan HTML box korang tu.
3. Then, korang amek code blogskin yang korang nak guna tu, then paste ke dalam HTML box yang korang dah kosongkan tadi. Nak amek code macam mana? Korang kena download template dia dulu. Pegi ke SINI untuk men-download.
4. Dah download tu, korang bukak code tu dalam notepad, then copy semua code dia. Lepas tu paste je dalam HTML box yang kosong tu. Save dan SIAP!^^
Lots of Love,Yana♥Labels: blog, blogskin, classic template, domo, tutorial