«
April 1, 2012 | 4:35 AM

#first time buat smoke tu jadi rainbow. mwehehe :D#
Okay, hari nie saya nak ajar korang cara nak daftar ChurpChurp. Korang mesti tertanya-tanya apa fungsi ChurpChurp nie sebenarnya. Fungsinya adalah untuk menambah duit poket korang. Heho. Paham? Da paham bagus. Kita teruskan dengan sesi pembelajaran kita kali ini ye?^^
1. Korang mestilah ada account ChurpChurp dulu. Kalau takde acano nak dapat duit en? So, click kat sini > ChurpChurp < untuk daftar ye? :)
2. Then Sign in With Facebook/Twitter > Login > Allow.
3. Authorize With Facebook > Submit > Authorize With Twitter (kalau ade) kalau takde > Skip.
4. Setup ChurpChurp account korang dengan detail dan tepat! Lepas tu tekan UPDATE!
5. Then pegi kat bahagian Setting > Isi Profile dengan betul *Nama, alamat, num fon* #penting untuk hantar cheque!# > Save.
6. Then korang boleh pilih kempen mana yang korang nak letak kat blog korang nanti^^
Lots of Love,Yana♥Labels: cara, churp churp, daftar, how to, tutorial
October 14, 2011 | 4:52 AM
Ada sesetengah template blogskin, dia punya comment link tak berfungsi. So, bagi mengatasi masalah ini, kita haruslah mengikut langkah-langkah atau inisiatif-inisiatif seperti di bawah \ayat karangan BM SPM. luls XD/
1. Dashboard > Template
2. Ctrl + F, search for this code :
<$BlogItemBody$>
3. Copy and paste this code AFTER code <$BlogItemBody$>
<center><a href="<$BlogItemCommentCreate$>"<$BlogItemCommentFormOnClick$>> <span style="font-size: 7.5pt; background-color:#ffffff; padding: 4px; text-transform: uppercase;"><$BlogItemCommentCount$> Comment(s) </span></a></BlogItemCommentsEnabled>
#yang merah tu boleh tukar kalau nak.##kalau korang dah ada code nie, sila skip step ni. Just proceed to the next step.
4. Then, korang pegi ke Setting > Comments > Comment Form Placement > Tick Pop-up window
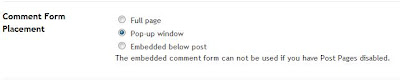
Save dan lihat hasilnya :D
Update
Kalau korang malas nak buat kerja banyak2 kali, korang boleh guna cara kat bawah nie untuk buat comment box tu berfungsi. Credit to Qay :)
1. Dashboard > Template
2. Ctrl + F, search for this code :
</blogger>
3. Jumpa? Copy this code and paste BEFORE </blogger>
<BlogItemCommentsEnabled><a class="comments" href="https://www.blogger.com/comment.g?blogID=YOUR BLOG ID&postID=<$BlogItemNumber$>&isPopup=true" onclick="window.open('https://www.blogger.com/comment.g?blogID=YOUR BLOG ID&postID=<$BlogItemNumber$>&isPopup=true', 'bloggerPopup', 'toolbar=0,scrollbars=1,location=0,statusbar=1,menubar=0,resizable=1,width=250,height=360');return false;"><$BlogItemCommentCount$> comment(s)</a></BlogItemCommentsEnabled>
#yang merah tu tukar dengan blog ID korang. Tak tau nak amek kat mane? Tengok kat SINI.#yang biru boleh tukar dengan ayat korang.
Lots of LoveYana♥Labels: add, blogskin, classic template, comment, enable, how to, inline, tutorial
|
 Disclaimer

This blog belongs to me and me only. All items made by me unless stated in credit section below. No ripping, spamming and copying w/o my permission. Respect me and I'll respect you. Thank you :)
Credits
This template 100% made by me. Yana Cheya. With little help from my old skins. For icons, I used Canva. Color got from HTML color code. Font from Dafont and Google Web Font. Kindly inform me if I'm using your materials but i don't mention here.
(c) Copyright by Yana Cheya. All right reserved 2012 (c)
|

The Webmiss

♥ Yan | Yana | Angah.
♥ Turns older every Jan 10.
♥ Nomad.
♥ Suka makan.
♥ My family is my priority.
♥ Happily married with a great man ♥.
♥ Having a kawaii and clever daughter ♥.
♥ Once a programmer. Now a mom and a domestic engineer. Enjoying my day as a domestic engineer.
? Le' Stuffies
Take all cupcakes you need :)

How to copy codes, highlight the codes and Ctrl + C. I have disable right click. Don't ask me again why you can't copy my codes. Do not copy my tutors without credits. No Plagiarism please! Or I'll shoot you just like Haibara Ai did! >:) Thanks for your visit :')
«
April 1, 2012 | 4:35 AM
#first time buat smoke tu jadi rainbow. mwehehe :D#
Okay, hari nie saya nak ajar korang cara nak daftar ChurpChurp. Korang mesti tertanya-tanya apa fungsi ChurpChurp nie sebenarnya. Fungsinya adalah untuk menambah duit poket korang. Heho. Paham? Da paham bagus. Kita teruskan dengan sesi pembelajaran kita kali ini ye?^^
1. Korang mestilah ada account ChurpChurp dulu. Kalau takde acano nak dapat duit en? So, click kat sini > ChurpChurp < untuk daftar ye? :)
2. Then Sign in With Facebook/Twitter > Login > Allow.
3. Authorize With Facebook > Submit > Authorize With Twitter (kalau ade) kalau takde > Skip.
4. Setup ChurpChurp account korang dengan detail dan tepat! Lepas tu tekan UPDATE!
5. Then pegi kat bahagian Setting > Isi Profile dengan betul *Nama, alamat, num fon* #penting untuk hantar cheque!# > Save.
6. Then korang boleh pilih kempen mana yang korang nak letak kat blog korang nanti^^
Lots of Love,Yana♥Labels: cara, churp churp, daftar, how to, tutorial
October 14, 2011 | 4:52 AM
Ada sesetengah template blogskin, dia punya comment link tak berfungsi. So, bagi mengatasi masalah ini, kita haruslah mengikut langkah-langkah atau inisiatif-inisiatif seperti di bawah \ayat karangan BM SPM. luls XD/
1. Dashboard > Template
2. Ctrl + F, search for this code :
<$BlogItemBody$>
3. Copy and paste this code AFTER code <$BlogItemBody$>
<center><a href="<$BlogItemCommentCreate$>"<$BlogItemCommentFormOnClick$>> <span style="font-size: 7.5pt; background-color:#ffffff; padding: 4px; text-transform: uppercase;"><$BlogItemCommentCount$> Comment(s) </span></a></BlogItemCommentsEnabled>
#yang merah tu boleh tukar kalau nak.##kalau korang dah ada code nie, sila skip step ni. Just proceed to the next step.
4. Then, korang pegi ke Setting > Comments > Comment Form Placement > Tick Pop-up window
Save dan lihat hasilnya :D
Update
Kalau korang malas nak buat kerja banyak2 kali, korang boleh guna cara kat bawah nie untuk buat comment box tu berfungsi. Credit to Qay :)
1. Dashboard > Template
2. Ctrl + F, search for this code :
</blogger>
3. Jumpa? Copy this code and paste BEFORE </blogger>
<BlogItemCommentsEnabled><a class="comments" href="https://www.blogger.com/comment.g?blogID=YOUR BLOG ID&postID=<$BlogItemNumber$>&isPopup=true" onclick="window.open('https://www.blogger.com/comment.g?blogID=YOUR BLOG ID&postID=<$BlogItemNumber$>&isPopup=true', 'bloggerPopup', 'toolbar=0,scrollbars=1,location=0,statusbar=1,menubar=0,resizable=1,width=250,height=360');return false;"><$BlogItemCommentCount$> comment(s)</a></BlogItemCommentsEnabled>
#yang merah tu tukar dengan blog ID korang. Tak tau nak amek kat mane? Tengok kat SINI.#yang biru boleh tukar dengan ayat korang.
Lots of LoveYana♥Labels: add, blogskin, classic template, comment, enable, how to, inline, tutorial